Documenting various persistence mechanisms would not be complete without mentioning these that could be based on legitimate and fully-documented system features. One such mechanism we are going to talk about is called ‘custom Power Shell profile’. It is a distant cousin of autoexec.bat and it can be abused to ensure some malware component is loaded anytime someone starts powershell host.
There is actually a full article describing this mechanism here, so I will just quote the most important (from the forensics perspective) bit:
- %windir%\system32\WindowsPowerShell\v1.0\profile.ps1
- This is for all users of the computer and for all shells.
- %windir%\system32\WindowsPowerShell\v1.0\Microsoft.PowerShell_profile.ps1
- This is for all users of the computer, but it is only for the Microsoft.PowerShell shell.
- %UserProfile%\Documents\WindowsPowerShell\profile.ps1
- This is for the current user only and all shells.
- %UserProfile%\Documents\WindowsPowerShell\Microsoft.PowerShell_profile.ps1
- This is for the current user only and only for the Microsoft.PowerShell shell.
You can test it by running the following commands (obviously file writing restrictions apply depending on the OS and the user privileges):
md %UserProfile%\Documents\WindowsPowerShell\
md %windir%\system32\WindowsPowerShell
md %windir%\system32\WindowsPowerShell\v1.0\

echo echo profile1 >%windir%\system32\WindowsPowerShell\v1.0\profile.ps1
echo echo profile2 >%windir%\system32\WindowsPowerShell\v1.0\Microsoft.PowerShell_profile.ps1
echo echo profile3 >%UserProfile%\Documents\WindowsPowerShell\profile.ps1
echo echo profile4 >%UserProfile%\Documents\WindowsPowerShell\Microsoft.PowerShell_profile.ps1
and then run PowerShell.
Btw. If you are wondering what these commands are doing – first 3 ensure the respective directories exist; the next 4 ones create dummy profile files with a simple command ‘echo xyz’, where xyz is a number of the profile. When executed for testing purposes they will simply show you which profile has been loaded by PowerShell. In a real-case scenario these would be replaced with an instruction to launch malware or could be any PowerShell command.
Anyway, back to the test. You will most likely be surprised to see that PowerShell does not load these profiles without a fight i.e. you may see a couple of error messages.
This is because by default the OS policy prevents executing PowerShell scripts (including the profile scripts) and one has to enable them first as documented here.
The Windows Registry values guarding this policy are stored under respective hkcu/hklm branches:
software\policies\microsoft\windows\powershell\
         EnableScripts (REG_DWORD)
         ExecutionPolicy (REG_SZ)
One can enforce then script execution by running the following commands (hklm may replace hkcu):
reg add hkcu\Software\Policies\Microsoft\Windows\PowerShell /f /v EnableScripts /t reg_dword /d 1
reg add hkcu\Software\Policies\Microsoft\Windows\PowerShell /f /v ExecutionPolicy /t reg_sz /d Unrestricted
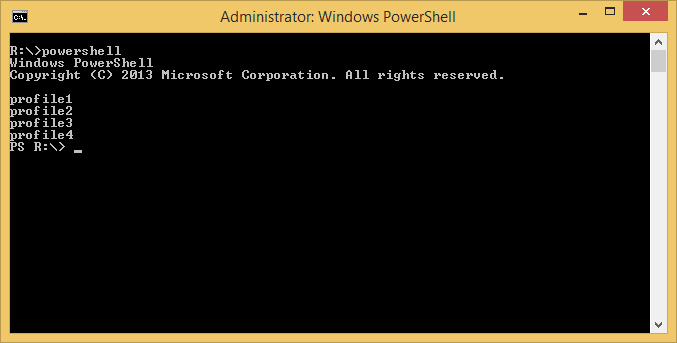
Launching PowerShell now will show the following:
You can download a batch file that I used to test the commands here.
Tested on Windows 8.1 and Windows 7.

